
Send and Analyze Quizzes/ Surveys in Microsoft Forms Pro
Have you ever wanted a simple easy way to capture data from your customers, partners or employees? If so then you are going to love Microsoft Forms Pro, the newest member of Microsoft’s Power Platform. Microsoft Forms Pro is a simple yet comprehensive survey solution that allows businesses to easily capture and analyze feedback to improve customer, employee, and product experiences. I decided to challenge myself to learn how to use this new project and write about it in a blog. This post is the last in a three-part series. Part one covered creating a survey. Part two covered creating a quiz. And finally, in part three, I will cover sharing your survey or quiz and viewing and analyzing the data.
Microsoft Forms Pro extends the capabilities of Microsoft Forms in Office 365. However, the basic Forms app included with Office has limited a limited toolset. Microsoft Forms Pro features additional functions, including advanced branching, theme customization, individual tracking links, data connection with Dynamic 365 workflow automation using Microsoft Flow, Response data is available in real time, but is also available in PowerBI for further analysis.
The public preview is available to anyone with a Microsoft work account, including both Microsoft Office 365 commercial customers, and Dynamics 365 customers. Forms Pro is expected to be a paid service, once generally available.
Sending Surveys and Quizzes in Microsoft Forms Pro
There are currently five different options for sending your survey or quiz. The directions I will give are for sending a survey. The process for sending a quiz is very similar, as the options are the same. (There are slight differences in what you will click on).
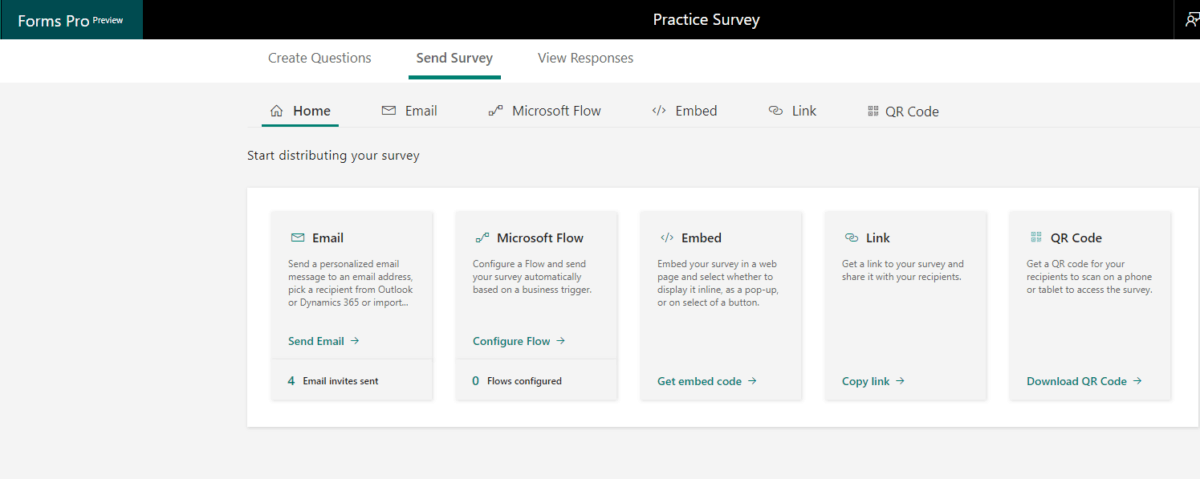
1. Email: Send the survey link by email using the built-in email feature.
-
- Simply open the survey you want to send, click on Send Survey> Email
- By default, a subject line and an unsubscribe link are auto-populated along with a button/ link to your survey. If you want to add an additional link to your survey in the body of your message, just click on Insert Survey Link.
- You also have the option to easily personalize your email and use by first name or last name.
- You also have the option to use preformatted email templates. These templates may be modified and saved.
2. Microsoft Flow: Send the email by configuring a business trigger with Microsoft Flow.
-
- You may also send a quiz or survey based on a certain business trigger, such as the resolution of a case, etc.
- To get started, simply open the survey you want to send. Click on Send Survey> Microsoft Flow.
- An email will pop up. Compose the text you want. Then select Configure Flow.
- You may choose either a preformatted template in Flow or create your own flow from scratch. Currently, there are templates available for the following scenarios:
- When a case is resolved.
- When a lead is qualified.
- When an order is fulfilled.
- When a certain button is clicked on in PowerApps.
- When a case is closed in Salesforce.
3. Embed: Embed the survey or quiz within a webpage by pasting the survey’s embed code into your webpage’s source code. You must first choose from one of the three options for how you want your survey to appear. Your three options are as follows:
To embed your survey:
-
- First, open the survey you want to embed. Go to Send Survey>Embed.
- Under Select the embed type for your survey, choose how you want your survey to appear. You have three options.
- Inline: The survey is displayed statistically on the webpage.
- Pop-up: The survey is displayed in a pop-up window (based on the respondent’s actions).
- Button: The survey is displayed when a certain button is selected.
- By default, the text on this button is “provide feedback.”
- Next, you have two options for adding parameters:
- Select one or all out-of-the-box parameters under Select parameters to add in embed code
- Create a new parameter by selecting Add custom parameter.
- Select Generate code.
- Lastly, select Copy and paste the embed code into the webpage.
- Don’t forget to update the page’s source code in order to render the survey on the webpage.
4. Link: Here you can copy and paste the link to the survey or quiz you created. Choose this option if you don’t have the emails of the people you want to see your survey.
-
-
- Open the survey, and go to Send Survey > Link
- Select Copy and paste the link in a place visible to your intended audience. They may gain access to the quiz by clicking on the link.
-
5. QR code: Send a QR code for your survey or quiz so that the quiz may be accessed by simply scanning it on a tablet or phone.
-
-
- Open survey, and go to Send Survey > QR Code.
- Select Download, and share the QR Code.
-
Viewing your Summary Responses
As you can see, there are many simple options for sending your survey or quiz. Once you have sent your survey or quiz, it is time to view your responses.
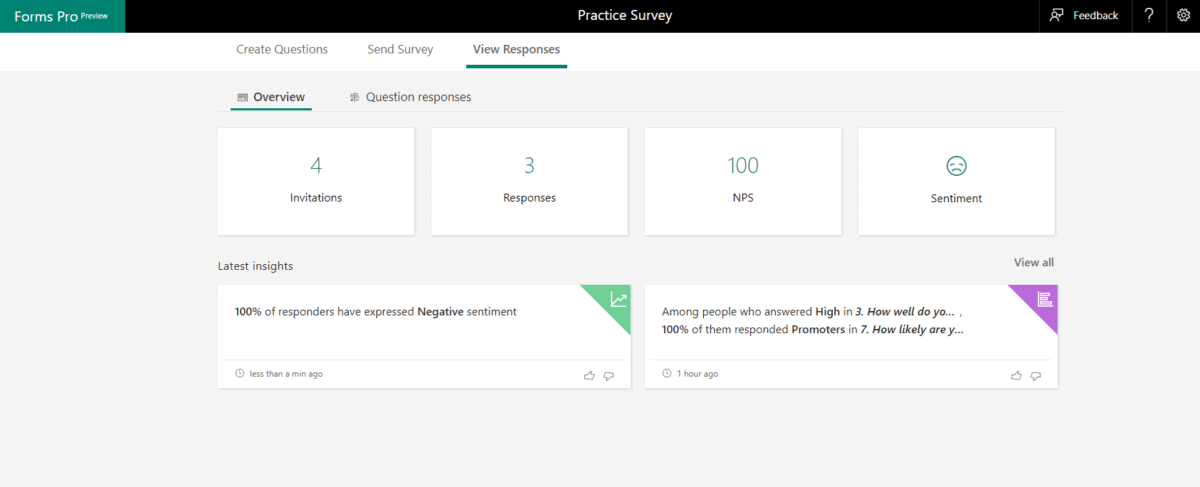
Open the survey you wish to view results for and select the View Responses tab.
Viewing Responses in Microsoft Forms Pro
On the Overview tab, summary data for your survey is displayed here. You will see:
- The number of invitations sent. When you click on this, you can see data such as:
- Who received the invitation
- Average turnaround time
- Failed invitations
- Invitation status
- Invitation trend
- The number of responses. When this is clicked on, such data is displayed:
- Average completion time
- Response ratio
- Response trend
- NPS
- The Net Promoter Score: This is based on a scale of 1-10.
- The Sentiment: (positive, negative, or neutral).
- Latest Insights: Click on the insights for more information
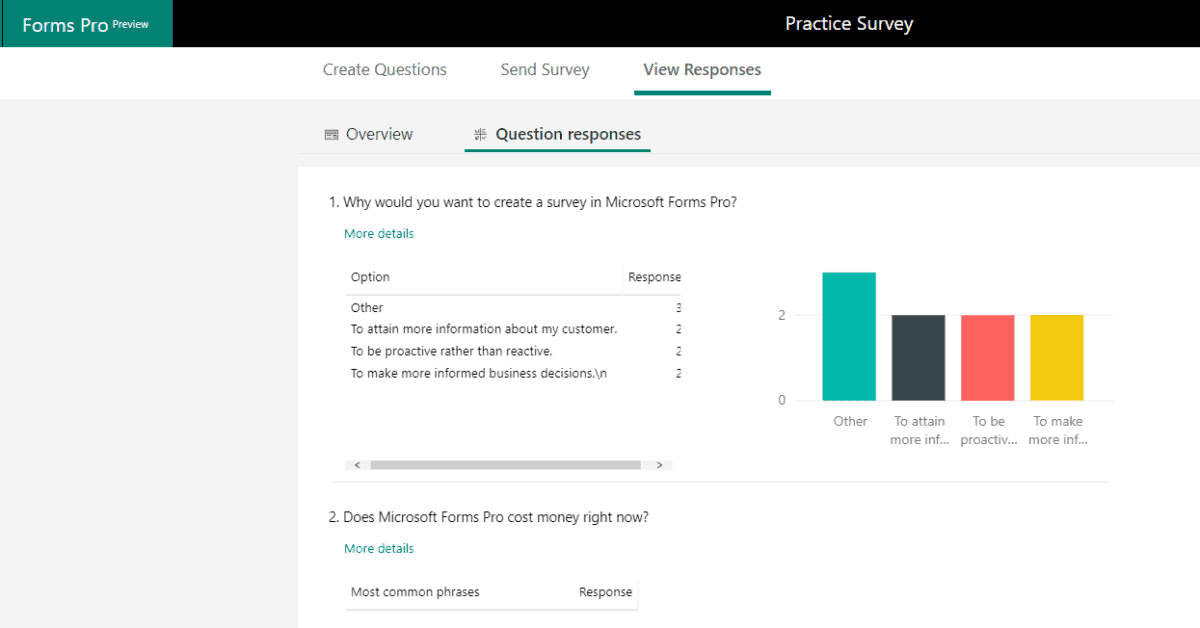
Viewing question responses in Microsoft Forms Pro
On the Question Responses tab, you may view details of specific questions. All responses are displayed here. Here, you can see how many responses every answer got.
- The data here is displayed in two ways:
- Text information
- Graphical visualization
- Click on More Information to get details on who specifically responded a certain way.
Analyzing Your Survey Responses and Insights
When a survey is submitted, a survey response record is created.
You have many options when viewing and analyzing your responses. You may choose to:
- Filter your responses (by name, date, or tracked/anonymous filters).
- Export Survey Results (to Microsoft Excel).
- Delete Survey Responses
Insights are only generated when there are a sufficient number of responses to a survey. This is displayed in the Analyze tab. Here you can see a correlation between responders, as well a pattern in responses.
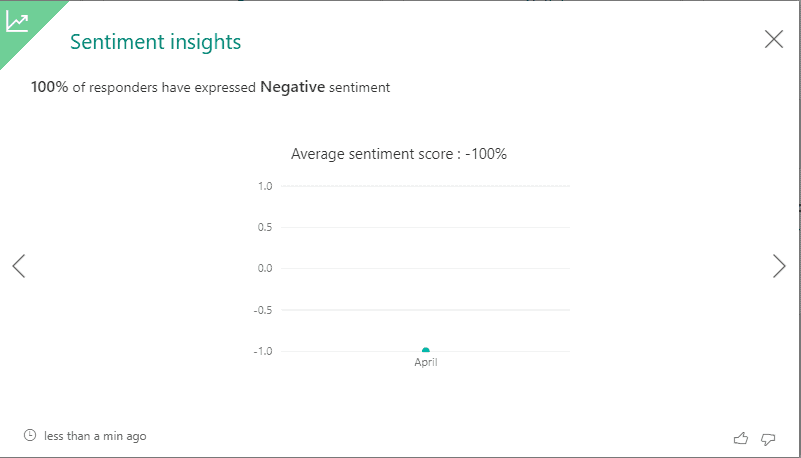
Sentiment Insights in Microsoft Forms Pro
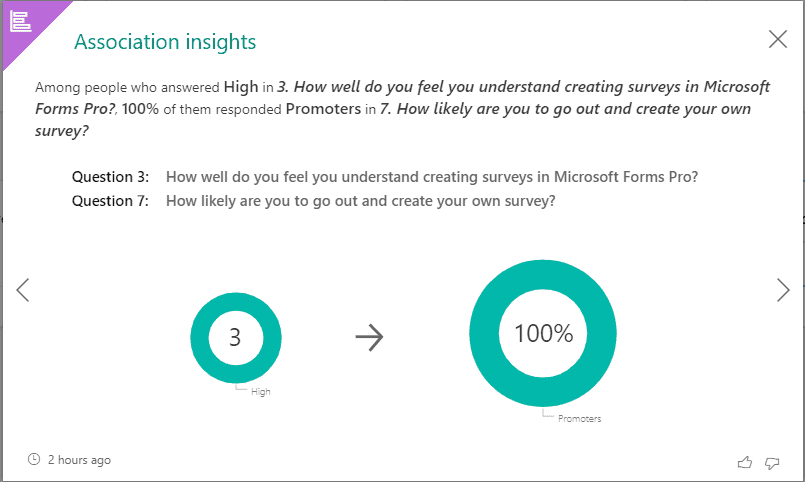
Association Insights in Microsoft Forms Pro
All the information you receive from your surveys and quizzes helps you to better understand your customers and enhance your customer’s experience. This allows you to be proactive rather than reactive. You can really get some valuable information about your clients/prospects. I found Microsoft Forms Pro to be a very useful and simple tool. We will definitely be using it!
More resources to explore
- Learn more about Microsoft Forms Pro in the April ’19 release notes.
- Get started with Microsoft Forms Pro on the Microsoft learning page.
- Engage with Microsoft on their community site, share your experience with Microsoft Forms Pro, and vote on future updates.
- Visit our Microsoft’s user feedback group to provide feedback or add recommendations.
- Sign up for the preview https://formspro.microsoft.com/en-us/
How Can We Help?
If you have any questions on getting started with Microsoft Forms Pro, feel free to contact the experts at enCloud9. We will be happy to help. In case you missed part one or two of this blog series, here they are again. Part one was a step by step tutorial on how to create a survey in Microsoft Forms Pro. Part two was a step by step tutorial on how to create a quiz in Microsoft Forms Pro. Both articles included an interactive survey or quiz you could take at the end.