This blog was originally published in 2021 but was recently rewritten to reflect current information, as the process for creating personal views has changed.
In today’s business world, quick access to and analysis of data is crucial. Dynamics 365 provides a robust solution for managing customer relationships and business operations, and one of its standout features is the ability to create personal views. These customizable views enable users to tailor data displays to their specific needs, boosting productivity and improving decision-making. This comprehensive guide will walk you through everything you need to know about creating personal views in Dynamics 365.
What are Personal Views?
Personal views in Dynamics 365 are user-defined data presentations that allow individuals to filter, sort, and display data in a way that meets their specific requirements. Unlike system views, which are predefined and available to all users, personal views are unique to each user, although they can be shared with others if desired. Sometimes, you may only want to see information that is relevant to you, so you may want to create a personal, or custom view.
Benefits of Personal Views
Customization: Tailor the data display to focus on the most relevant information.
Efficiency: Save time by quickly accessing the most pertinent data without navigating through unnecessary information.
Productivity: Enhance your workflow by creating views that support your specific tasks and processes
Step-by-Step Guide to Creating Personal Views
Creating a personal view in Dynamics 365 is a straightforward process. Follow these steps to get started:
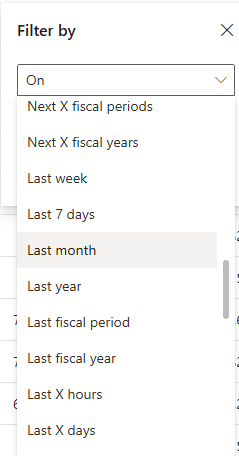
Step 1: Start with filtering the views
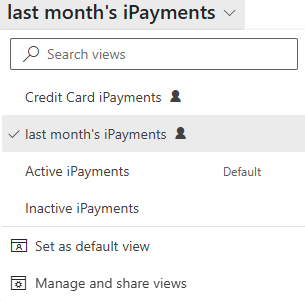
The first step in creating a personal view is to filter the views. Filtering the views lets you extract information from any column within the view and apply filters to it. This process helps you reduce the number of records displayed, ensuring that you only see those that are relevant to you. For the purpose of this blog, I decided to demonstrate creating my own personal view. There are times that I don’t want to see all iPayments and I only want to see the iPayments that were made last month, I started by filtering the date by last month.
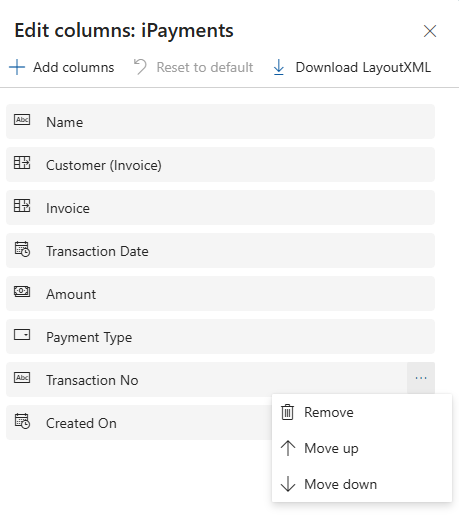
Step 2: Add or Remove Columns in Your Personal View
Adding or deleting rows in your personal view allows you to only see what’s relevant to you and makes your data more manageable and focused.
Click on the button at the top of your view called “edit column.” From there, you can choose to either add or delete columns.
To remove columns – click on the column and choose “remove.’
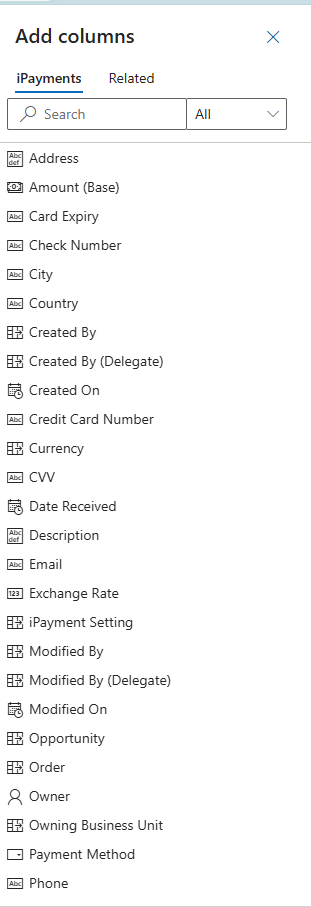
To add columns – click on “add columns” and choose the column you want to add.
From here, you can also move columns by simply dragging and dropping.
Step 3: Save Your View
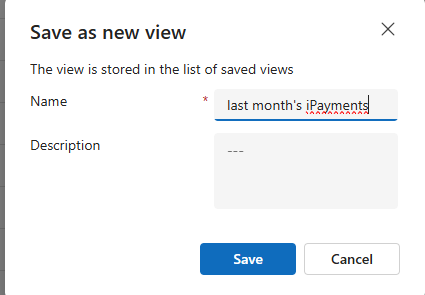
Once you’ve created your personal view, it’s now time to save your view – so you can easily find it later.
Click Save As New View: in the window that pops up when you click on the view view.
Name Your View: Enter a name and description for your new view. Choose a name that clearly describes the purpose of the view, making it easy to identify later.
Save: Click “Save” to finalize and create your personal view.
Step 4: Access and Use Your Personal View
Now that your personal view is saved, you can access and use it whenever you need.
Select Your View: In the view selector dropdown, find your newly created personal view. (You will know it is a personal view by the fact that it will have an icon of a head and shoulders next to it.
Sharing Personal Views
Sharing your personal view is easy, especially if it can benefit others in your organization. Simply click on the arrow next to your view and select “manage and share views.
Best Practices for Creating Personal Views
To make the most of personal views in Dynamics 365, consider these best practices:
Use Clear Naming Conventions: When naming your views, use clear and descriptive names that make it easy to understand the purpose of each view.
Regularly Review and Update: Periodically review your personal views to ensure they remain relevant. Update filters and columns as needed to reflect changing business needs.
Leverage Existing Views: When creating new views, consider starting with an existing system or personal view that closely matches your needs. This can save time and effort.
Conclusion
Creating personal views in Dynamics 365 is a powerful way to customize your data experience, improving efficiency and productivity. By following the steps outlined in this guide, you can easily create, manage, and share personal views tailored to your specific needs. Whether you’re filtering customer information, analyzing sales data, or tracking project progress, personal views empower you to access the information you need quickly and efficiently.
How Can We Help?
At enCloud9, we specialize in helping businesses maximize their productivity and efficiency with Dynamics 365. Our team of experts offers personalized support and comprehensive solutions tailored to your specific needs. Whether you’re looking to create custom personal views, manage complex data sets, or optimize your overall use of Dynamics 365, we provide the guidance and tools necessary to streamline your operations. We also offer training, integration services, and ongoing support to ensure your team can leverage the full power of Dynamics 365, helping you achieve your business goals with greater ease and efficiency. Contact us today.