What is Microsoft Teams Live Events?
So, you’ve likely used Microsoft Teams for chat, messages, and meetings, but did you also know that you can also host webinars in Teams? Microsoft Teams Live Events are an extension of Teams meetings – enabling users to broadcast video and meeting content to a large online audience. Teams Live Events are meant for one-to-many communications where the host of the event is leading the interactions and audience participation is primarily to view the content shared by host. It is simple to create and market a Teams Live Event. There are 4 simple steps to follow when holding a Microsoft Teams Live Event: brainstorming, marketing, preparation/performance, and post event wrap up. This blog is part of a two part series. Part one will cover what Teams Live events are – as well as planning setting up your Teams Live Event. Part 2 will cover marketing your Teams Live event – as well as post event wrap up.
With so with so many options for webinar hosting services, why would someone choose to use Microsoft Teams as their platform for hosting webinars?
There are many reasons someone would choose to host webinars in Microsoft Teams using Live Events.
- Cost – This is a very significant factor in choosing webinar hosting services. If you are already using Teams, why pay for another service when you already have the functionality? Getting started with Teams live events is not difficult. Initially, you may have more work to set things up, but once you have it running, the benefits simply outweigh any additional work you may have to do.
- More Control – This is where Microsoft Teams Live events shines bright. When it comes to moderating a webinar, it is vital to be in full control. One of the ways Microsoft Teams Live Events allows you to be more in control is in the recording of the webinar. YOU choose when you begin and end the recording, something that is not an option in many other webinar software tools. To start the recording in a Teams live event, simply click on the 3 ellipses in the meeting panel and select Start Recording. When ending the call, it is suggested to end the call for all attendees, so that attendees don’t linger. You also have control over what attendees see. You can choose to show your whole desktop or just a specific window. You can choose to put your camera on or leave it off. Another thing you have control over is the roles of the participants. There are 3 roles – presenter, producer, and attendees.
- Easy Editing – Once you have your Live Event set up, you can edit the details in Meeting Options. Here you have control over such things as who can enter the call, who needs to wait in the lobby until they are admitted, or who can present content within the meeting.
- Attendees access – Attendees will have access to the recording, as well as your PowerPoint presentation – if you choose. Attendees can easily share your content or refer to it at a later time.
Step one: Planning and Set up of your Microsoft Teams Live Event
When planning a webinar you must first make an outline for your webinar. Consider the amount of time you have and what you want to cover in that time. The basic format we follow for our webinars is as follows:
- Introduction (first five minutes or so) – during this time, we introduce who we are, state the topic of our webinar, let people know that we will be recording the webinar, and covering any rules for the webinar (i.e. – questions at end).
- Demo (the majority of the time) – Walk through your topic in a meaningful way to engage your viewers. Everyone is busy. We want people to feel that attending our webinar was a good use of their time. Make sure not to focus to much on the technical side of things – focus on the benefits!
- Wrap up – Now is the time to review questions from your audience. (You may want to have a couple questions ready to go just in case)! Let attendees know that they will be getting an email with follow ups from the webinar.
At the beginning stage of the planning for your webinar is brainstorming. You must first decide how often you want to do webinars. Will your webinar be a one-off event or part of a continual series? Another question you may want to ask yourself is how long your webinar will last. EnCloud9 holds a monthly 30 minute webinar. Everyone is busy and we felt that for our audience, 30 minutes was appropriate.
The next thing you need to decide on is a topic. It is important to consider your audience. Think about what is new in your industry and what your audience wants to hear about. Look at the analytics of past social media posts and blogs. What has generated the most interest? Look at what your competitors are blogging about and doing webinars on. What is the best way to share your expertise? Will you have a co-presenter or will you bring in an external expert?
And of course giving yourself adequate time to prepare is key. Make sure you have enough time to perform all the work required. Practicing and doing a few trial runs is a good idea.
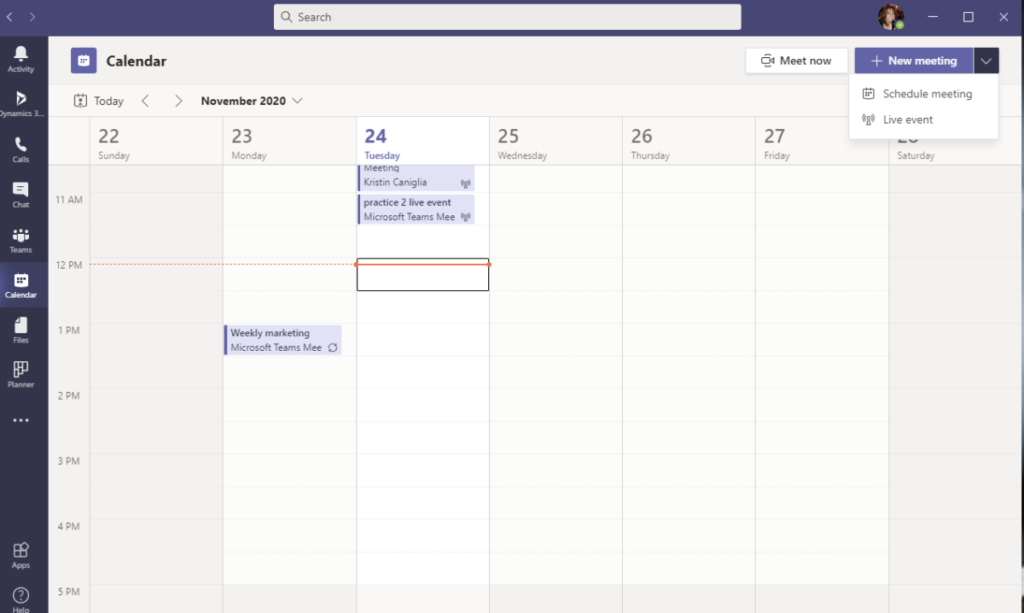
After deciding on a topic, it is now time to create your live event in Microsoft Teams. Simply go to your calendar and in the upper right corner, next to new meeting, click on the down arrow and choose Live Event.
It is now time to fill in details for your webinar.
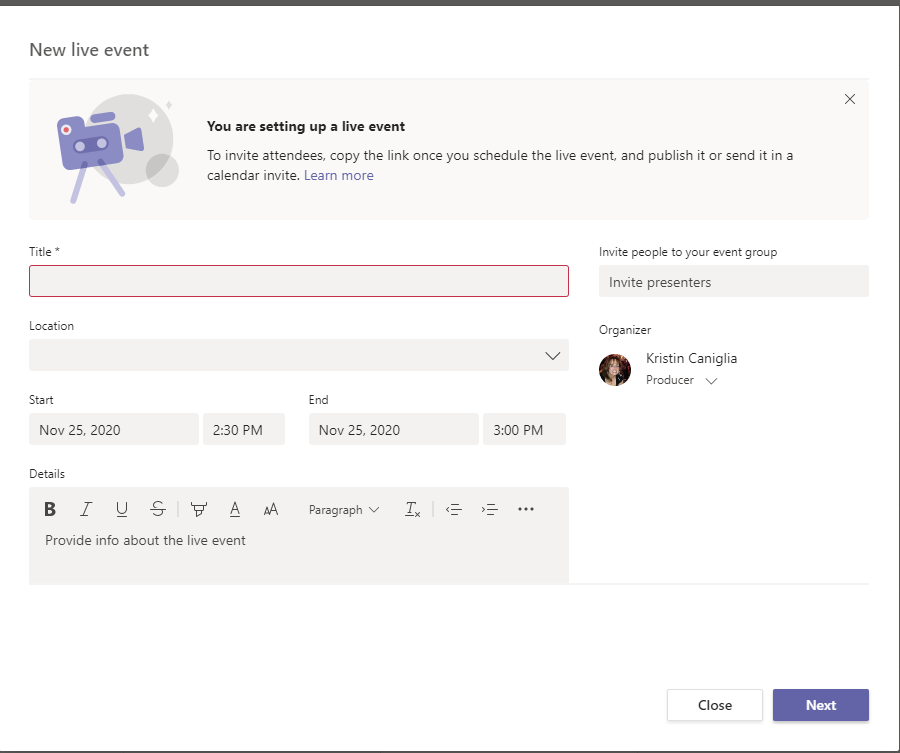
When you scroll down, you will see more options, such as whether you want a Q&A session or an attendee engagement report.
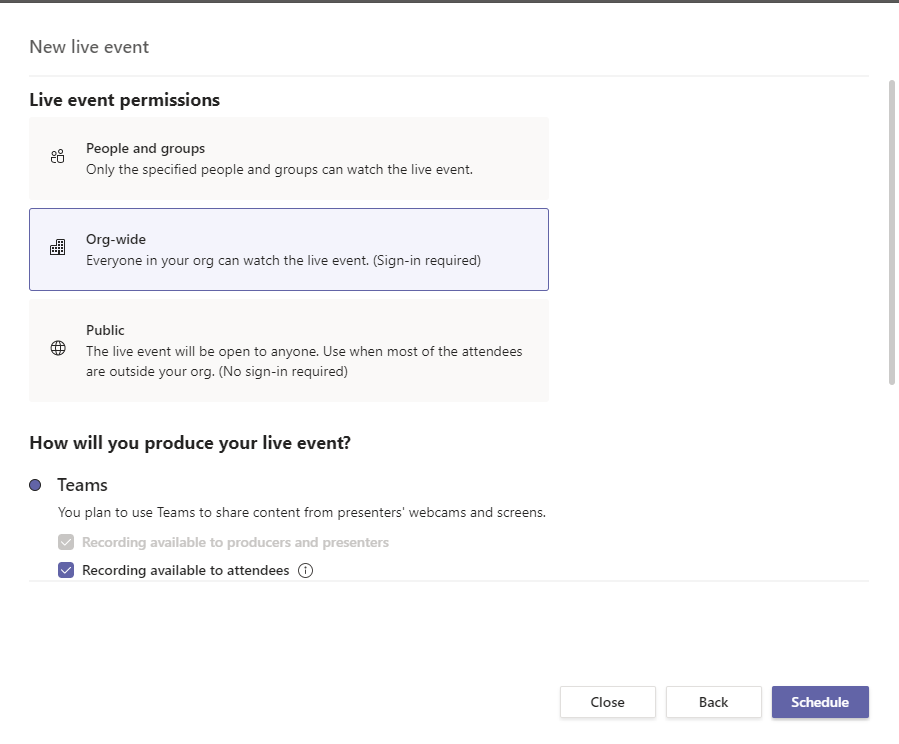
*Important to note that when you invite people to your event, you have to chose the role you wish them to have. There are 3 roles: producer, presenter, and attendee. It is important in assigning roles that you understand exactly what each role can and can’t do.
- Producer – There should only be one producer. The producer is in charge on controlling the live event. The producer sends the event live and also finishes the event. The producer can share their content or that of the presenter. Once the live Q&A session has been switched on, presenters can also act as moderators.
- Presenter – There can be multiple presenters on your live event. Each presenter can share their audio, live video, or content on a screen sharing – as well as content from other presenters (if you have more than one).
- Attendee – Depending on how you set your live event up (public or private), attendees can be external or internal. Attendees can either join the live event by using their invitation link or they can choose to view the event in their web browser of Teams app.
In Conclusion
Webinars are among the best marketing platforms. Webinars establish you as an authority in the field and allow you direct contact with your target group. Holding webinars actually saves time and money, as they allow you a global audience without having to travel. Webinars allow you to reach a large amount of people at once. Remember, the hardest thing about doing webinars is just getting started. Decide you want to do it and just get started. You won’t be perfect. You will evolve with time and practice.
Get started today – happy planning!
How Can We Help?
If you have any questions on getting started with Teams Live events or if we can help you with any of your Dynamics 365 needs, don’t hesitate to contact us. We would be more than happy to assist you. enCloud9 is a recognized expert in helping organizations like yours get the most out of their Dynamics 365 system.
Join our January 2021 webinar about The New Search Experience in Dynamics 365. Topics for future webinars will be announced soon and registration will be available on our website, as well as on our Facebook page.
Visit our YouTube channel for other informative webinars or our blog for the most current and up to date information.