
Dynamics 365 Marketing consists of two modules: Real time Marketing and Outbound Marketing. Outbound Marketing focuses on social posting, landing pages, lead scoring, and more. Real-time marketing, on the other hand, focuses on using real time customer behavior to trigger customer interactions. In this blog entry, we will discuss, a feature of Real-Time Marketing – Customer-Led Journeys.
Customer-Led Journeys in Real-time Marketing
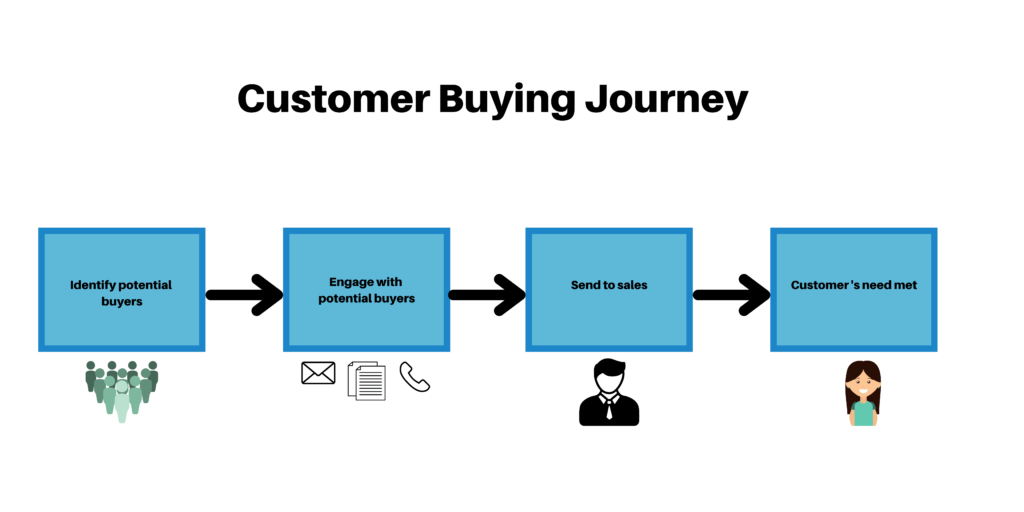
Dynamics 365 Marketing lets you build powerful customer journeys that are tailored to the products you are selling. A customer journey is a path a customer takes while interacting with your marketing process. The reason the customer journey in Real-time Marketing is customer led is that the customer behavior triggers automated customer interactions.
Customer Journeys in Dynamics 365 provides a graphical journey that works much like a simple board game. Each contact starts on the first square and then progresses through the journey one square at a time, with each square representing a marketing initiative (action).
Marketers can easily see and automate the journey – all while interacting with customers in real time. The goal of the Customer journey, is that upon its completion – prospects will be turned into revenue.
Finding an existing journey
To view your customer-led journeys, navigate to Marketing>Marketing Execution>Customer Journeys. This brings you to a list view, in which you can search, sort, and filter the list to find an existing journey.
Getting started with brand new customer journey
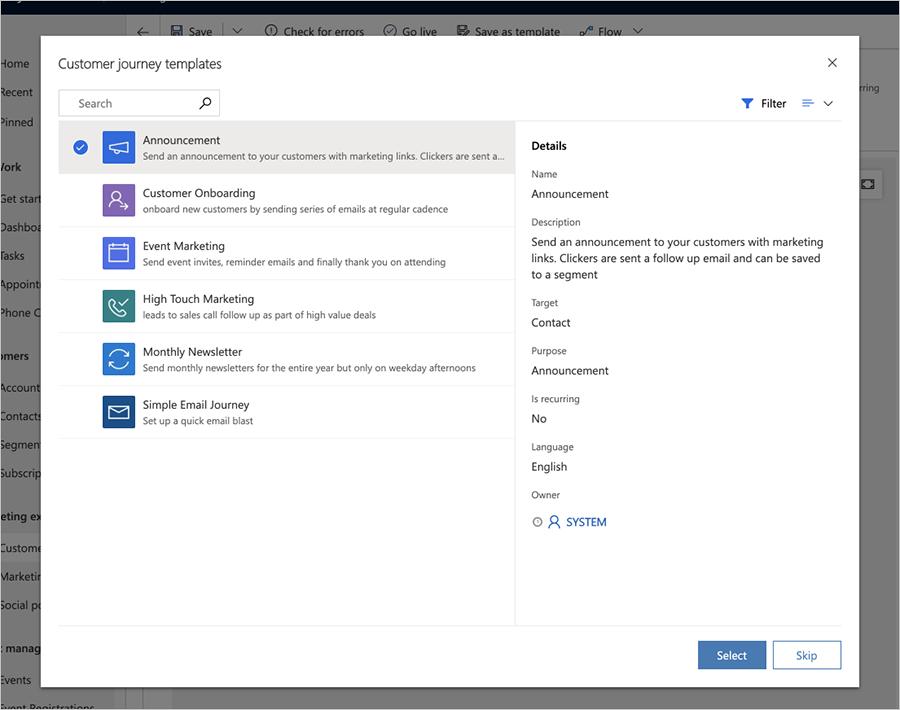
To create a new Journey, select New on the command bar. A list of customer journey templates will be displayed, which can help you get started quickly. The Customer Journey templates dialogue box is comprised of a categorized overview of templates along with the ability to search for the template you are looking for.
Each template represents a particular type of campaign and includes a pre-configured pipeline as well as a few related settings to help you get started quickly.
If you don’t want to use a template, you can start from scratch. When creating or editing a customer-led journey, you’ll be working on the customer journey form page.
For more information on how to work with each type of tile available for constructing your customer-led journeys, check out the customer journey tiles reference page.
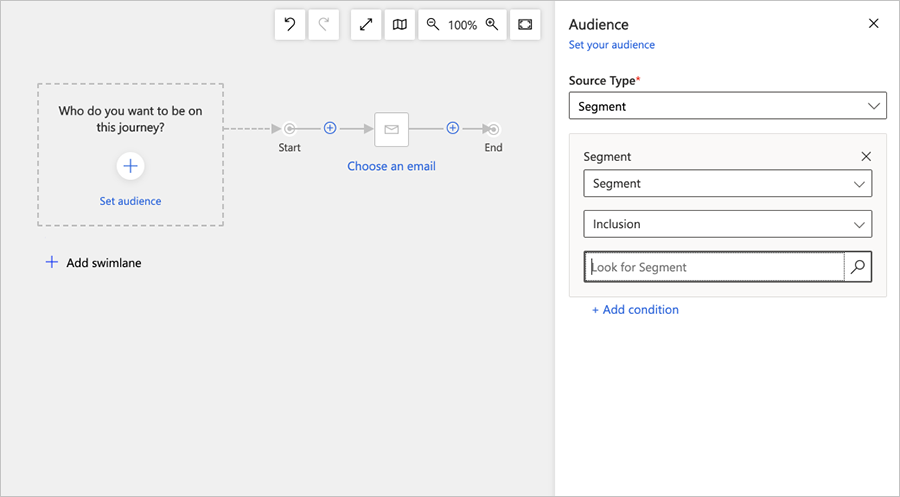
- The first task is to select the audience. The first tile in the automation represents the target audience for the customer journey (or who will be taken down the path in the customer journey). Your target audience can be chosen using segmentation. A segment is a list of contacts you will target with a customer journey. Click here for more information on working with Segments in Dynamics 365 Marketing.
When you first create a new customer journey, the journey will display a Status Reason of Draft – meaning that the journey is inactive and it wont send any messages or do any other processing. When everything is in place and you are ready to start running your journey, change the Status Reason to Live.
Click here for more information about going live to start running the journey, monitoring the journey, or viewing milestones of the cycle.
2. Next define the steps you want your audience to take throughout the journey.
3. Create your customer journey creating canvas using an in-place menu that pops up each time you want to add a new step to the journey. Using in-place editing, you can create or edit any form directly within the new customer journey designer.
4. Using the Design tab, design your campaign by adding tiles and configuring them.
5. Add new tiles to the pipeline by selecting them from the in-place menu shown and pressing the + button on the canvas. More tiles can then be added, either by using the in-place menu using a mouse or by not using a mouse at all and using the arrow keys instead. Each tile represents a step in the customer journey. There are 3 types of triggers: in-the box triggers, self created triggers, and custom events (requires some code).
6. Configure your tile settings. You must decide what will happen at each step in the journey.
To configure a tile, select it in the pipeline, then go to the settings tab at the right of the canvas.
Saving an existing customer-led journey as a template
You also have the ability to save an existing customer-led journey as a template. If you have created a customer journey that you think you would like to use for future campaigns, you can follow a few short steps to save your journey as a template.
- Go to Marketing>Marketing Execution> Customer Journeys
- Open your existing customer journey.
- Select Save as template on the command bar.
Getting started with Dynamics 365 Marketing
Dynamics 365 Marketing includes a bundle of apps and solutions carefully selected to support marketing departments and coordinate with sales. Some of these apps and solutions are available as add-ons or bundles with other Dynamics 365 products, while others are only available as part of the Marketing package. Contact the Marketing experts at enCloud9 to learn more and to get started. Start turning prospects into business relationships.
enCloud9’s Marketing Accelerator is a fully integrated CRM and marketing automation solution designed to connect marketing and sales teams.
If you are looking for a better way to identify, target, and nurture prospects, contact the marketing automation experts at enCloud9. In addition, check out other blogs we have written about marketing.
To learn more about How Dynamics 365 Helps Throughout the Customer Buying Journey, visit our blog.